First of All, A Big Fat thanks goes to the iPhone dev team. Class A engineering team IMHO.
The following tutorial is not a general tutorial that will work for everyone. It is rather a documentation of my unlock process. It worked for me from the first time, and I got no errors whatsoever along the way *knocks on wood*. Some guys asked me to do a write up, so here it is. In this tutorial some instructions are copied verbatim from other guides (the guide from forum member jprooney, and iphone.unlock.no). I am not claiming everything below is written by me. I used some instructions from different tutorials to do my unlock, and this guide is rather a mixed bag of these guides.
About my iPhone: Before doing the unlock, my iPhone was already jailbroken, activated, and youTube was working. I used a powerbook and it took me around 40 mins from start to finish to get have my iPhone unlocked and working on o2 in Germany. I have tested Calls in/out, SMS in/out. youTube works too.
Now let's get started...
Pre-cautions:
- Keep the phone docked and connected to some power source. We don't want to run out of battery mid-unlocking.
- Remove any SIM cards in the tray.
- Make sure you have firmware 1.0.2 on the iPhone.
- Avoid iTunes 7.4. This tutorial assumes you use 3.7.
- Make sure iTunes and iTunesHelper are not running.
- Disable auto-lock on the iPhone. You can do this by going to Settings>General>Auto-Lock>NEVER.
- Set the iPhone IP address to static. You can do this by going to Settings->WiFi>Select network>static. Make note of your IP address at that point too.
Unlock Preparations:
- Jailbreak and Activate your iPhone using iNdepedance.
- Install SSH using iNdepdance. Change the password afterwards.
- Download and install Installer.app V 2.4 from here. Installing it is dead simple. Download it and run the installer. It will guide you through the process.
- After installation, a new icon will appear on home screen of the iPhone called "installer".
- Tap on the installer icon. Select the "update" tab and install the update v2.6.
- Go to the "install" tab and install the BSD subsystem. This is not instant, it will take a few mins so don't panic and do anything stupid.
- Reboot the iPhone.
Unlocking:
- Download the unlock files. I didn't use all the included files. Only 5 of them.
- Open Cyberduck or Fugu and connect to the iPhone. Do that by filling in the IP address, username (root), and password (same as that of SSH).
- Use it to Copy 5 files from your computer to /usr/bin directory on the iPhone. These files are: iUnlock, ICE03.14.08_G.fls, nor, minicom, bbupdater.
- On the iPhone, browse to /usr and create a new directory called local. Go into local and create another directory called etc.
- After you are finished, the directory structure /usr/local/etc should be present.
- Close Cyberduck/Fugu.
- Open Terminal (applications/utilities or just use spotlight to find it).
- SSH into the iPhone. it is time to do the serious stuff. You can do that using the command ssh root@ipaddressoftheiphone. it will ask you for the password.
- If you enter the password correctly, you will be presented by the sign #, indicating you are now in the iPhone command-line.
- Type cd /usr/bin.
- Note: One thing to note about typing in commands in the shell: You can auto-complete command names and file names by hitting tab. Using it is good because you can avoid any typos and type in commands much faster.
- Type chmod +x bbupdater hit enter. Note: after hitting enter, you should get no result, It means it is successful. It will go back to # sign.
- Type chmod +x iUnlock hit enter.
- Type chmod +x minicom hit enter.
- Type launchctl unload -w /System/Library/LaunchDaemons/com.apple.CommCenter.plist . Hint: Use tab to auto-complete.
- Note: When you hit enter, you will notice on the iPhone screen at the part that previously said "No SIM" will now display "--". You have now just turned off the baseband. Nice!
- Now, we arrive at the most time-consuming part of the unlocking. It will take around 20 minutes (yes, it is that slow). Before you run that command makes sure that your iPhone is properly charged. Type in iUnlock ICE03.14.08_G.fls nor
- The first thing you will see is "sending erase command" then it will start displaying a double digit number, starting "00". This is like a progress bar, it will start advancing as the task is being completed by scrolling down the screen.
- After it is done, the last word you will see from running the command as an output is "Enjoy". This indicates the command finished successfully.
- To confirm that it went well type in bbupdater -v . Look for xgendata somewhere in the ouputs - if you find it, it means it was succsessful.
- Type in minicom -s hit enter.
- Select Serial port setup (with your down arrow key) then press enter/return.
- At the next screen, type: A
- Your cursor will now be at the Serial Device line. Type: /dev/tty.baseband Then press enter/return.
- Press the escape key. Select Save setup as dfl and press enter/return. You will get a pop up message saying Configuration Saved.
- Select Exit. Then press enter/return.
- Type in AT hit enter. You should get OK for response.
- Type in AT+CLCK="PN",0,"00000000" hit enter. You should get OK for response
- Type in AT+CLCK="PN",2 hit enter. You should get this for response +CLCK: 0 OK. if this is the case your iPhone is unlocked.
- You are almost done. Remember the command you entered early on to disable the baseband. Well, now it is time to re-enable it.
- Type in the command launchctl load -w /System/Library/LaunchDaemons/com.apple.CommCenter.plist
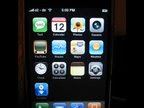
Now, you are done. Put in your SIM card and reboot. If everything went fine you should see something like this.
Enjoy!

Geen opmerkingen:
Een reactie posten